Thursday, October 31, 2013

Glam Polish: Frankenslime

Happy Halloween everyone!! One of the things I like about Halloween is the Halloween goodies! They come in all sorts of funny and cute forms such as pumpkin-shaped marshmallows and buns that look like witch's fingers. It's the time of the year to sink our teeth into sweet treats and forget about the diet!

And of course, another thing that I am most excited about is... Halloween polishes! It's always really exciting to see polish makers come out with interesting ideas for Halloween, especially when they make polishes according to certain themes such as movies and cartoons.


This time, I am particularly attracted to a polish by Glam Polish called Frankenslime. I think it is inspired by the monster Frankenstein judging by the name and the color of the polish.  It has small purple hex glitters and lime hex glitters of various sizes. It a rather darker green polish than I had expected. The green is like The Hulk kind of green, which I am not very fond of. However, I still like it because it reminds me of acid. The micro lime glitters make this polish look like it's bubbling. Haha! Anyway~ I applied 2 coats of Frankenslime to reach opacity and dap on the bigger glitters. The biggest lime hex glitters are quite difficult to fish for though. The polish is really smooth and it's a breeze applying it. I must say that Glam Polish really have the formula right!


Glam Polish Frankenslime: 2 coats with topcoat


Micro shot of Frankenslime. It looks so acidic!


Thanks for reading! :)
XOXO


Saturday, October 12, 2013

Covergirl: Midnight Magic

This is another polish I bought from my Australia trip. Even though this polish is named as Midnight Magic, I actually bought it because I think it looks like the galaxy! This polish is so packed with micro glitters that the color is ethereal and hard to tell- is this a blue or grey polish? After applying it on my nails, I realized that it tends towards grey more than blue because of the micro glitters. I can vaguely see that it has light green,blue and purple micro glitters. It took me 3 coats to reach opacity and it is also really smooth to apply.

Covergirl Midnight Magic: 3 coats with topcoat


Close-up shot: Look at the micro glitters!

Under artificial light

Look at those shimmers!


Thanks for reading! :)
XOXO


Tuesday, October 8, 2013

The Face Shop: Lemon Candy Yogurt

Time for Korean nail polishes!! Big Korean cosmetics brands such as Etude House, The Face Shop, Innisfree etc have put in a lot of effort in nail polish creation recently. It used to be just polishes of various colors but now, there are more and more glitter polishes being created! And it's not just simple one-color-glitter polishes they are making. They have rode on the trend of indie polishes and creating the likes of it! Yippee! AND, the quality of Korean nail polishes just get better! They used to be really goopy and dry up really fast. But for the newer Korean nail polishes that I have bought, they still have not dry up yet after at least 2 years! Furthermore, their glitter nail polishes are smooth and easy to apply too. Ahh, I am just glad that Singapore has access to Korean nail polishes and they are at a reasonable price too! :)

The Korean polish I have used here is The Face Shop Lemon Candy Yogurt. I hardly take note of yellow polishes but this really caught my eyes. I like the combination of gold, copper and green hex glitters and micro gold and green glitters in a pastel yellow base. This polish is really smooth to apply and I can get a lot of glitters with one brush stroke. I have applied 3 coats of Lemon Candy Yogurt to get full opacity.

The Face Shop Lemon Candy Yogurt: 3 coats with topcoat


Thanks for reading! :)
XOXO

Tuesday, September 24, 2013

Naild' It: Beginner's Magic

Naild' It Beginner's Magic is one black jelly glitter bomb! It has bar, square and hex glitters in all sorts of colors that it would be difficult for me to count. It has so much glitters that the polish is quite dense. One good thing about a glitter-dense polish is that there will be lots of glitters with just one brush stroke. The black jelly base is a little too sheer to my liking though. But I must say that it's really to achieve the right opacity of black jelly base. I am just glad that this is not too opaque such that the glitters in the previous layers are being covered up. I added 1 coat of China Glaze Liquid Leather and 2 coats of Beginner's Magic for this mani.


Naild' It Beginner's Magic: 2 coats, 1 coat CG Liquid Leather. With topcoat. 


Here's a comparison between 4 coats of Beginner's Magic on its own (left) and 2 coats Beginner's Magic, 1 coat Liquid Leather (right).


Thanks for reading! :)
XOXO


Thursday, September 19, 2013

Sally Hansen Lustre Shine: Azure

Sally Hansen Lustre Shine Azure is one of the polishes I bought when I was on a holiday in Australia. For me, it was love at first sight with this polish. It's those polishes which you know you HAVE to get them when you set your sight on them. This blurple polish looks so rich and velvety! It makes me feel like my nails will cost a few hundred bucks when I paint it on. Haha!

Anyway, it took me 3 coats to reach opacity. I was wondering if I should have layered it over a coat of black polish instead. Hmm.. Oh well! Luckily it was able to reach opacity. :) But one thing about this polish is that it is not really self-leveling. There were some bald spots which I had to fill up before applying topcoat. But I really love this polish a lot so I shall forgo this minor flaw!

Sally Hansen Lustre Shine: 3 coats with topcoat


And then I added some floral stamping with ENAS Art Stamp. The stamp can really create crisp images but I definitely require more practise with stamping.


Under artificial light


Thanks for reading! :)
XOXO


Wednesday, September 11, 2013

PolishTBH: Midnight

Ahh, I am finally getting back to blogging. Blogging really requires discipline and I am slightly lacking in it. :S But from now on, I will try to blog about most of my manis! :)

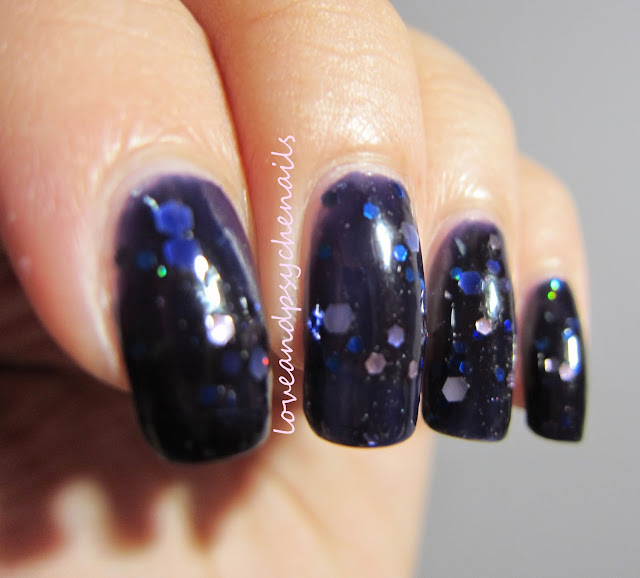
To kick start, I have PolishTBH Midnight here. I thought it would be a blue polish but it turns out to be a really dark blue or close to purple polish. There are sliver medium and small hex glitters, blue small glitters and a dash of holo glitters. The holo glitters are more obvious in the bottle than on my fingers though. For the mani below, I have applied 2 thick coats and did a little placement with the glitters. The polish is quite smooth to apply and it does not thicken during usage. This polish really has a lot of depth and the silver hex glitters just enhance it. And because of this polish, I think I am starting to like all polishes with silver hex glitters!

PolishTBH Midnight: 2 coats with topcoat


Under artificial light


Thanks for reading! :)
XOXO


Friday, July 26, 2013

Pahlish: Three French Hens + ENAS Art Stamp review

I know, I know, Pahlish Three French Hens is from their 2012 Christmas collection and you must be thinking that I am such a slowpoke for only swatching it now. Oh well, better late than never! Haha! I shall do a short one though, so we can zoom in on ENAS Art Stamp review!

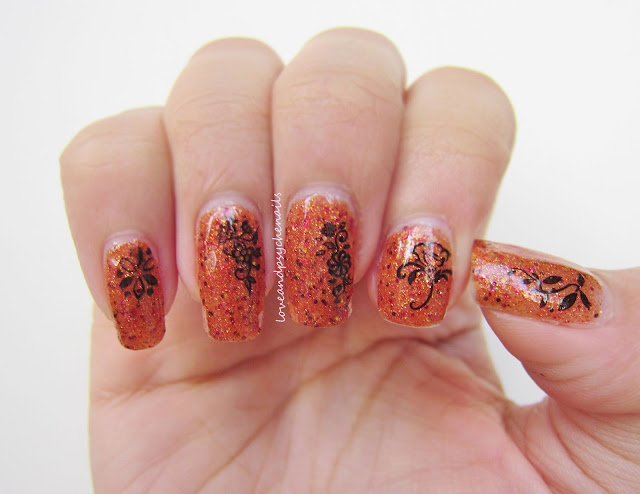
Pahlish Three French Hens is a burnt orange polish and I think it's quite suitable for autumn season as well. It has red and yellow small glitters and yellow micro glitters (that sparkles like gold bits). It is so packed with all the glitters that it became quite a textured polish! Turns out that I like this polish more than I expected. It is so sparkling even without topcoat!

Pahlish Three French Hens: 2 coats without topcoat

Pahlish Three French Hens: 2 coats with topcoat


ENAS Art Stamp review

Now, for the second part of this blog post. I had bought 2 ENAS Art Stamps awhile ago from strawberrycupcake (Qoo10). I was a bit skeptical at first but since it was on sale at that time, I decided to give it a try. I only bought the Art Stamps but not the nail polish that they recommended. Therefore, I have used Essence Black is Back in this review. 


Verdict:
The flower prints can transfer quite well onto my nails even without using the nail polish that they recommended! :) Of course, it requires some practising to get clear prints on the nails. For the first few times that I tried, I either smudged the prints or didn't manage to get most of the print onto the nails. Then, I realised that in order to transfer the print nicely, you have to press the Art Stamp on the nail for a few seconds (~10s) before removing the Art Stamp slowly.

The main appeal of this Art Stamp is that it allows you to add more than just one color to the print (unlike the usual stamping plate). For example, you can use a red polish for the petals of a flower design and use a green polish for its leaves. Whereas for normal stamping plates, the most you can do is create a gradient of colors on a print but not add specific and precise colors to the print. Although I have not tried it yet, I will do it soon and add on to this post! So keep a lookout for it! :)


Thanks for reading! :)
XOXO