Friday, December 28, 2012

Pretty & Polished: Libra Scales

Libra Scales is a blue glitter bomb! It has blue square glitters, small hex glitters and shard glitters in a blue jelly base. It was quite easy to apply but the glitters need to be built up. There weren't a lot of glitters in 1 coat.

Libra Scales: 2 coats alone with Seche Vite topcoat


Of course, to make it more representative of "scales", I have to stamp scales over them!

Nail polishes used for scales, from thumb to pinky: Essence Sparkling Champagner, Michelle M49, Essence Chic Reloaded, Essence Mystic Mermaid, Essence Glisten Up!

Thumb: Essence Sparkling Champagner

From the picture, I think Essence Mystic Mermaid shows up the best as scales, while Essence Glisten Up! can't be seen at all.


Thanks for reading! 
XOXO

Friday, December 14, 2012

Jindie nails: Candy Land

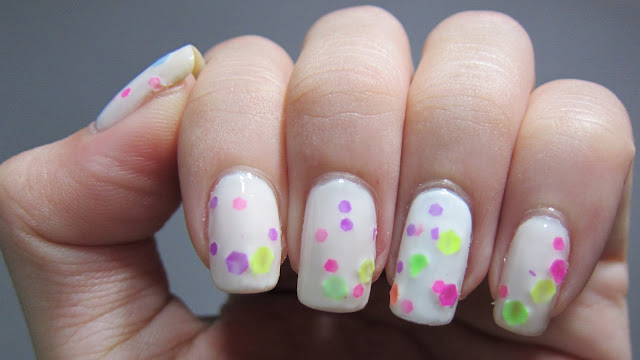
I have got Candy Land from Jindie Nails!! Wheee~!! HAHA. I wanted to try it the moment I received. It just look so pretty! Here are the pictures of Candy Land!


Under artificial light

Under artificial light

Under indirect sunlight

For the swatch, I have applied 2 coats of 2 base colors before applying 2 coats of Candy Land. In my opinion, I feel that it is a MUST to apply a base color as applying Candy Land alone will not give full coverage and it may be a bit streaky. 


I have used Tony Moly Sugar Apricot (off-white crelly) as base color for all fingers except the ring finger and used The Face Shop white polish for the ring finger.

White base color vs off-white base color

With the white polish as base color, I was able to use the dabbing method to apply Candy Land. With the off-white polish, I have to use the usual nail painting method as the base color wasn't opaque. If you have an off-white polish that is opaque, you can use the dabbing method to apply Candy Land. The dabbing method is better as it allows you to position the hexes nicer.

So what do you think of Candy Land? Better with white base or off-white base? :)


Thanks for reading! XOXO

Monday, December 10, 2012

Tutorial: Cute Duckies Mani

Hi everyone! Thank you for dropping by! :) I'm Pauline and I am glad to be sharing with you about my passion for nail polish. I am sure most of you who are reading this now have the same passion as me! :) My blog will be mostly about nailart tutorials and sometimes on swatches. I just want to share what I have learnt about nailart and make it easier for ANYONE to paint their own nails. I am not saying that I am a pro but I am learning as some of you are. Therefore, some of the posts maybe a bit amateurish. :P As I was saying that I wish to make nailart easy for everyone, the tutorials that I will be posting will be manageable and most will not require you to be an artist. ;) Alright, enough talking. Let's begin with the first tutorial!


My first post is on how to create cute little duckies mani.


Firstly, I have used these colors:
L-R: Essence:Wanna be your sunshine, Black is back, Michelle:  M43, The Face Shop: white (unnamed), China Glaze: Rainstorm


Tools that I have used:
Dotting tool 1 is larger than dotting tool 2.


1. Paint a blue polish as base color, Here, there are 2 coats of The Face Shop white polish and 2 of China Glaze Rainstorm.
2. Using just the brush from the nail polish bottle, paint an elongated semi-circle slowly. I have painted it with 2 coats of Essence Wanna be your Sunshine.
3. Using dotting tool 2 (the smallest dotting tool you can find), slowly dot the hair outwards. 
4. Using dotting tool 1 (slightly bigger dotting tool), dot the eyes with a black polish. I've used Essence Black is Back.
5. Using dotting tool 2, dot horizontally with an orange polish (or red jelly polish like Michelle M43) to create the beak. Take note that the beak must be between the eyes or slightly longer, otherwise it will just look like a Joker ducky. 
6. Using dotting tool 1, dot around 4-8 dots to create the clouds. Lastly, seal your mani with a topcoat and you're done!

Hope this tutorial has made it easy to create this mani!

Thanks for reading! XOXO